Stain System. Online Manual

Overview
Stain System is an asset that allows to add splatter effects like paint, dirt or blood to Unity games. The asset includes scripts, shaders, textures and prefabs as well as demo scenes and presets that show how to use Stain System.
When developing Stain System we tried more than 10 different ways to perform a simple task – render as many as possible particles on a surface without overflowing into neighbour spaces. We have come up with a robust and flexible solution which is a combination of two techniques – using bitmap textures or a single mesh with custom shaders to draw splatters. While this allows to adapt the system to most applications and assures optimal performance, Stain System is not a simple drag-and-drop asset. Using it requires a selecting one of the two rendering methods and in some cases using a provided material on your game assets.
Stain System includes two major components that perform the same task of generating and rendering splatters in different ways:
- Bitmap splatters – use textures to render particles. This approach allows to generate infinite number of splatters without ever slowing down, but it allocates some texture memory in the areas where splatters may be spawned. Here are advantages and disadvantages of this approach:
- ➕ Infinite number of particles on any platform.
- ➕ Can be used on moving or static objects.
- ➖ Currently, only works in 2D.
- ➖ Uses texture memory to generate splatter areas. Amount of memory is discussed in a section below.
- ➖ Paint is not shared among the pre-positioned splatter-receiving areas touch or overlap.
- ➖ Once splatters are spawned, they cannot be individually removed.
- Mesh splatters – use a single dynamic mesh to render particles. This approach allows to easily generate lots of particles, but the number of particles is limited. That said, this limit is way higher than most (even mobile) games require. Internally, this approach uses Unity’s build-in particle system to generate the mesh because it’s the only way to access and modify vertices with zero memory allocation. Here are pros and cons of this approach:
- ➕ Works in 2D, 3D and isometry with a limitation of being planar (doesn’t simulate physical behaviour on corners).
- ➕ In addition to the normal alpha blending, it’s possible to use multiply blending.
- ➕ Anti-aliasing is possible and does not require any additional set-up.
- ➕ Splatters can be tweened out after a time-out.
- ➖ Number of particles is bound by GPU. Normally, it handles well up to 10K particles on old mobiles and more than 20K on desktop.
- ➖ Splatters cannot be moved with dynamic objects.
Once you have decided on the approach that best suits your game, you can follow the instructions in one of the sections below. Note that bitmap and mesh splatters can be mixed together in the same scene.
Note. The Demo Scenes included in the Asset package are represented in both Bitmap and Mesh modes.
Bitmap Splatters
Here is how to use bitmap splatters:
- Drop Prefabs/BitmapSplatterArea in your scene and place it over an area where splatters may be spawned. You can resize this object as you like. Duplicate it to cover all such areas, but try to keep them tight since each area is occupying texture memory equal to its size. If the areas where splatters should be visible are not rectangular, the effect can be rendered based on objects behind the area. In this case you should use the BitmapSplatterAreaSelective prefab instead of BitmapSplatterArea. This also requires setting material of all sprites that are behind the area and can receive splatters to the included Materials/SpriteSplatterSurface material. Check out the Demo2 – Platformer (Bitmap particles) for an example of this case.
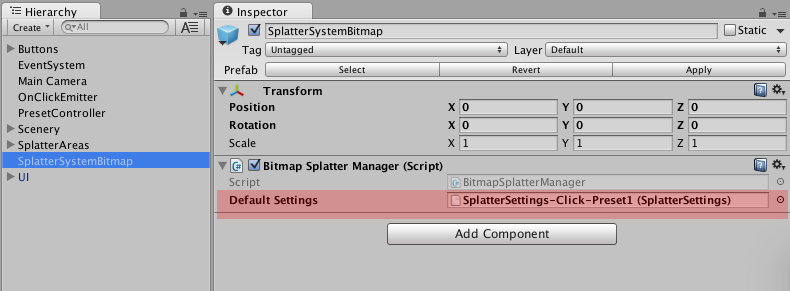
- Drop the Prefabs/SplatterSystemBitmap into the scene. This object manages all the areas we added in the previous step.
- Create new SplatterSettings object or select an existing one and assign it to the Default Settings field of the Splatter Manager component of SplatterSystemMesh Game Object (see screenshot below). Splatter Settings objects are described in detail in a section below.
- To spawn a splatter you need to write code (or use assets such as Playmaker) that calls the Spawn(Vector3 position) method of the Splatter Manager component. You need to pass the position of the desired splat center in world coordinates. Additionally, you may pass a Splatter Settings object, a color, or a direction to override the default settings.
Mesh Splatters
Here is how to use mesh splatters:
- To see stains on a mesh you need to do either of:
- Use the included Materials/SpriteSplatterSurface or Materials/StandardSplatterSurface on the painted sprite/mesh. You should set material of all sprites/objects that can receive splatters to one of those two materials. Check out the Demo2 – Platformer (Mesh particles) for an example of this case. Here is a quick explanation:
- Materials/SpriteSplatterSurface is the same material as Sprite-Default, but can display splatter effect. You can use it instead of the standard sprite material in 2D games.
- Materials/StandardSplatterSurface is the same material as Standard, but can display splatter effect. You can use it instead of the standard material in 3D/isometric games. 2.Set stencil buffer in your own shader to the same value as in the stain material (default is 128). This is done by adding the following code into the Pass section of the shader code:
Stencil {
Ref [_StencilRef]
ReadMask 128
WriteMask 128
Comp Equal
}
- The effect is always rendered only on object that use one of the provided shaders. For convenience, there are also materials that already have the shaders assigned.
- Drop the Prefabs/SplatterSystemMesh into the scene. This object manages all the splatter particles in the scene.
- Create new SplatterSettings object or select an existing one and assign it to the Default Settings field of the Splatter Manager component of SplatterSystemBitmap Game Object. Splatter Settings objects are described in detail in a section below.
- To spawn a splatter you need to write code (or use assets such as Playmaker) that calls the Spawn(Vector3 position) method of the Splatter Manager component. You need to pass the desired position of splat center in world coordinates. Additionally, you may pass a Splatter Settings object, a color, or a direction to override the default settings.
Hint. If you want more splatters at lower resources cost – use the complex texture that already contain the variety of “splatter debris”. Use either the ones that come with the Stain System asset, or prepare custom splatter textures. See Example – Click Scene – Presets 2, 8.
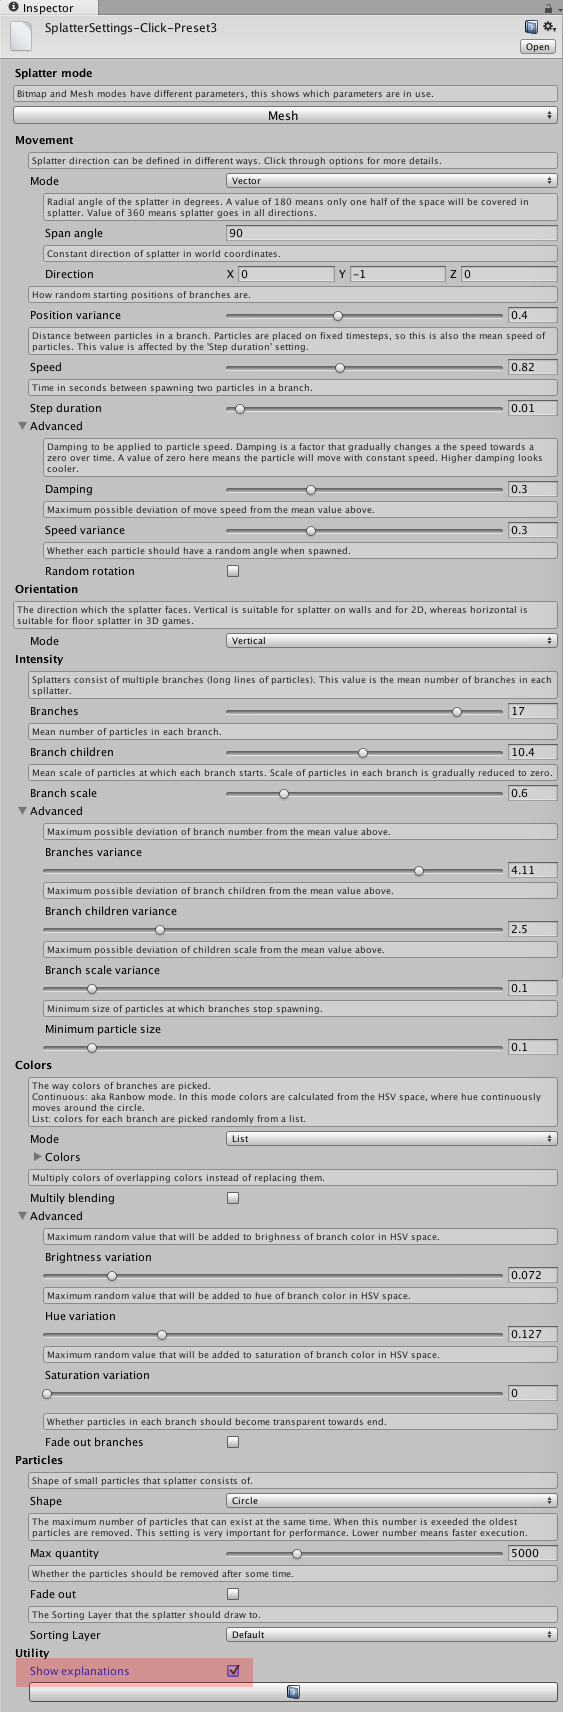
Splatter Settings
Splatter Settings is a reusable configuration file that describes how splatters behave and look. To create such file right-click anywhere in the Project window and select Create ▶︎ SplatterSettings. A new file will appear in your project that can be dropped into the Default Settings field of SplatterSystemBitmap or SplatterSystemMesh or when calling the Spawn method on either of these components. Explanation of each parameter is included in the Inspector view of the settings, to view them, check the Show explanation box at the bottom of the settings inspector.
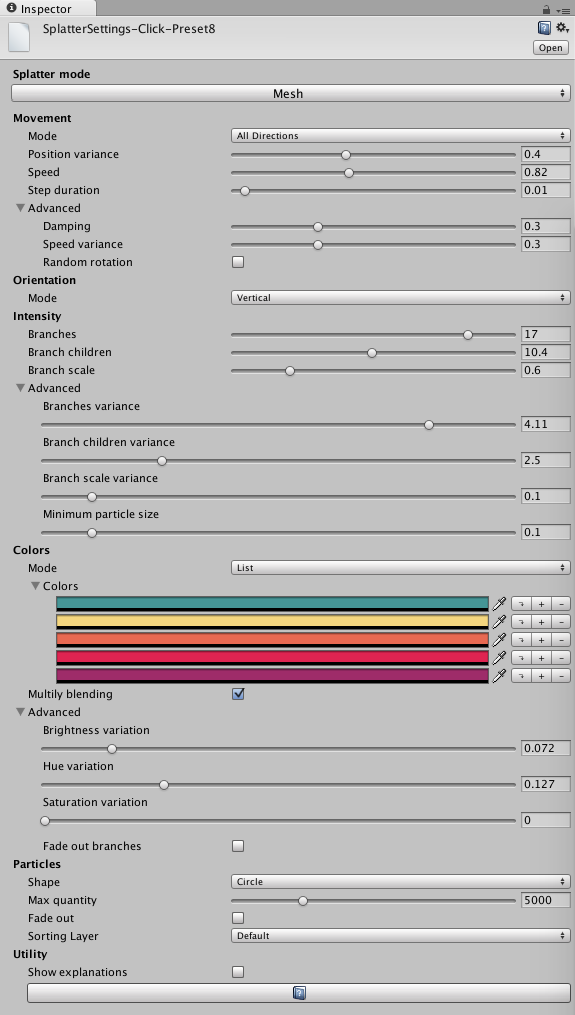
Below is the screenshot of the Splatter Manager Inspector Panel with Show Explanations engaged.