Flight Kit. Under the Hood (Manual)

Thank you for your interest in Flight Kit!
This is the comprehensive guide using Flight Kit, a complete package flight simulator indie game. Here you will find the information that will help you figure out how to adjust the Kit for your own needs and preferences.
Getting Started
Flight Kit has three root-level folders:
- COLR – a set of color control shaders that can be used in any game;
- Flight Kit – flight simulator-specific assets, an example game, Parse The Sky, and all the assets used in it. This includes environment models, UI textures and scripts, boids, etc.
- Standard Assets folder contains a subset of scripts and effects from the Unity’s Standard Assets that we used in the package.
The COLR and FlightKit folders are split internally into folders by asset types.
To start working with the package you can either modify the existing ExampleLevel or MinimalSetup scenes (located at FlightKit/Scenes/) or create a new scene and drop the needed prefabs into it (explained in the next section). If you choose to start with an existing scene, we recommend duplicating it before modifying, since it will be updated in the upcoming Flight Kit releases.
Creating a Scene
Anything with colliders will work as environment. Any external models or packages that generate meshes can also be used with no additional set up.
If you need a fresh scene with an airplane and a take-off platform, you can duplicate the MinimalSetup scene and start adding environment elements to it right away.
If you would like to create a scene from scratch or add flight capabilities to an existing scene, you need to do the following:
- Drop TakeOffPlatform prefab into the scene. Alternatively, you can place any object with a collider and set its tag to ‘TakeOffPlatform’.
- Drop one of the Airplane prefabs into the scene and position it on the take-off platform. You can, of course, create own Airplane prefab, which is discussed in a section below.
- Put the GameObject which you want the camera to follow into the Target field of AirplaneCameraRig’s AutoCam script. Usually you want to link the CameraTarget GameObject of an Airplane prefab. It’s an empty GameObject located at the center of the Airplane.
- Replace the standard main camera Game Object with the AirplaneCameraRig prefab from FlightKit/Prefabs. The prefab contains Unity’s MultipurposeCameraRig fine-tuned for airplane motion and a FOVController that changes Field of View of the camera depending on its velocity (to amplify perception of speed). AirplaneCameraRig also contains the Particle System and Audio Game Objects, which can be removed if not needed.
- Drop the LevelScripts prefab into the scene. It contains all scripts that control the game flow. You probably also want to check ‘Play On Start’ on the Start Level Controller script. If you would like to have the provided menus on your level, use the UICanvas prefab instead of the LevelScripts prefab.
- Hit play! Your plane should take off and you should be able to fly around!
Chaining Levels
Attaching scenes to other scenes is defined in the LevelCompleteController class (you can find it in hierarchy: UICanvas ▶︎ LevelScripts). The default behavior is meant to be overridden in the only method of this class, HandleLevelComplete. What actions need to be performed when the player wins a level is up to you – it heavily depends on what game you are making. That’s why the default behavior is just restarting the current scene.
Adding New Airplanes
To set up your own airplane from scratch, use the following steps:
- Start with a suitable scene. There has to be enough flat ground for a sensible take-off.
- Place your 3d model in the scene.
- Add the AeroplaneController script. (this will automatically add a required Rigidbody component).
- Add the AiroplaneUserControl script.
- Add a suitable Collider (or set of Colliders), so that it doesn’t fall through the floor or fly through evnvironment.
- Set the tag of the Game Object that contains colliders to ‘Player’.
- Hit play, try taking off. (Arrows/WASDQE are the default controls scheme).
- The friction of your Colliders against the ground may prevent take-off, or cause the plane to turn awkwardly during take-off. In this case you’ll either need to reduce the friction of the Colliders touching the ground (by assigning a low-friction physics material to the Colliders), or add Wheel Colliders to your plane so that it can roll along the ground before take-off (as we have done in the sample prefabs provided).
You can then mix and match the other optional components to add features such as engine sound, animated flaps, and propellers. Also, you can find some components like target-based AI, take-off and landing, etc in the Unity’s Standard Assets.
The AeroplaneController script exposes a number of properties which determine the power and handling of the aircraft, however ultimately the script is designed to provide a fun arcade game-like feel rather than attempting to be a realistic simulation of aircraft aerodynamics. It is possible to set up aircraft that will glide and stall, but ultimately the emphasis is on performance and fun rather than realism.
Configuring Fuel Mechanic
The script responsible for configuring fuel is FuelController (screenshot below). It can be found on the LevelScripts GameObject. If you don’t need the fuel mechanic, you can turn off this component or remove it from the GameObject. In this case, you also don’t need FuelUI(-Rect, -Circle, -Dial) GameObjects in the UICanvas (turn them off or remove).
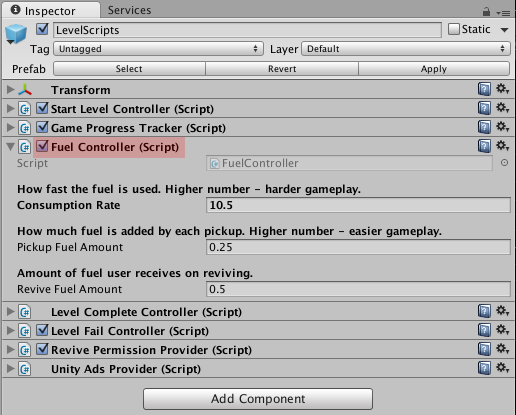
The parameters exposed by FuelController are:
- Consumption Rate – How fast the fuel is used. Higher number – harder gameplay.
- Pickup Fuel Amount – How much fuel is added by each pickup. Higher number – easier gameplay.
- Revive Fuel Amount – Amount of fuel user receives on reviving.
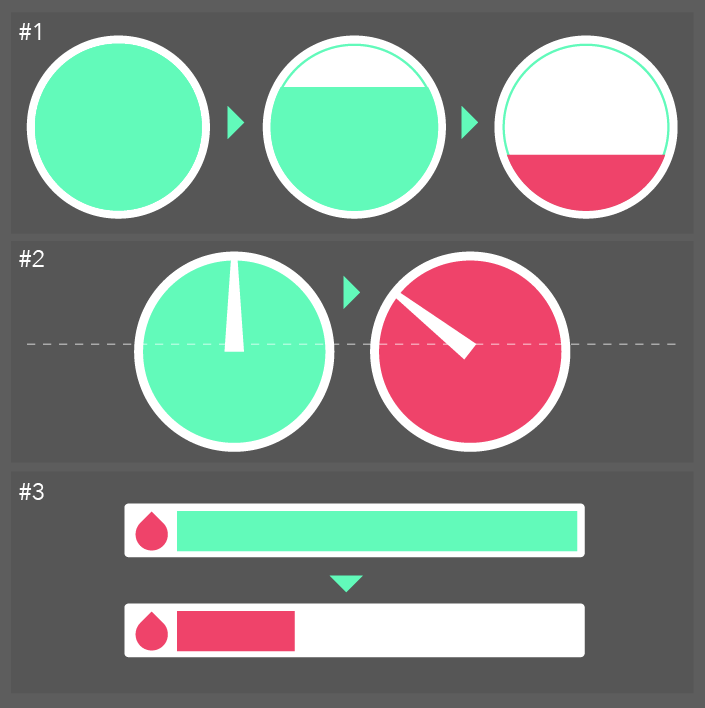
There are three kinds of fuel UI out of the box (illustration above): FuelUICircle (#1), FuelUIDial (#2), FuelUIRect (#3). You are free to choose whichever you like most, or equipping different planes with different UI, or even let users earn new UI for their airplanes. To use certain fuel UI just drop one of the prefabs from FlightKit/Prefabs/FuelUI into UICanvas GameObject.
Of course, you can add your own FuelUI. For this, in your script you can find the object of type FuelController and render fuel amount depending on its fuelAmount field. Check out the file FuelProgressBarRect.cs for an example.
Menus, UI and Events
All User Inteface in Flight Kit is made with the standard Unity GUI and do not require any additional assets.
The pack includes Main Menu and Pause Menu, both of which provide access to the Controls Submenu. To use those in your game, just drop the UICanvas prefab into a gameplay scene. If you prefer the main menu to be separated into its own scene, check out the Menu scene, which contains only the UICanvas. Loading a gameplay from the menu can be done by adding an OnClick() call to the Play button or listening to OnPlayClicked event (more on events below). The prefab also includes the HUD, which in case of the demo game is a counter of the collected spheres that appears once the first one is picked up. The additional touch and tilt inputs for mobile are implemented in the MobileUI prefab. It contains two invisible buttons covering most of the screen for left and right yaw controls, a Pause button in the corner, a ‘Calibrating’ popup for tilt controls and the tilt controls scripts.
To make it easier for different components to react to user input, the following events are emitted globally by the game:
- UIEventsPublisher.OnPlayEvent is fired once the user clicks Play on the menu (or on the start of the game if there is no menus).
- TakeOffPublisher.OnTakeOffEvent is fired once the user-controlled airplane has taken off the ground. Useful for tweening in effects and HUD.
- PauseController.OnPauseEvent is fired when user pauses the game.
- PauseController.OnUnPauseEvent is fired when user resumes the game.
- ControlsPrefs.OnTiltEnabledEvent is fired once user changes the mobile controls to tilt. Used internally to switch controls schemes.
- ControlsPrefs.OnTiltDisabledEvent is fired once user changes the mobile controls to touch. Used internally to switch controls schemes.
- FuelController.OnFuelLowEvent is fired once the user-controlled airplane’s fuel gets below 25% of capacity.
- FuelController.OnFuelEmptyEvent is fired once the user-controlled airplane has ran out of fuel.
- RevivePermissionProvider.OnReviveRequested is fired once user presses revive button on the out-of-fuel screen. The included AbstractAdsProvider class listens for this events to know when to show ads. You can override this behavior as you wish (see the Managing Ads section for details).
- RevivePermissionProvider.OnReviveGranted is fired once user views ads, pays, or completes any other action needed for reviving. To set a custom action you need to extend AbstractAdsProvider.
To subscribe to events you can do the following:
using FlightKit;

...

void OnEnable() {
  UIEventsPublisher.OnPlayEvent += OnPlayClicked;
}

void OnDisable() {
  UIEventsPublisher.OnPlayEvent -= OnPlayClicked;
}

void OnPlayClicked() {
  // ... do stuff here ...
}
Standalone & Mobile Controls
To switch from Standalone to Mobile controls you need to change the build platform of Unity to the desired mobile platform and go to menu Mobile Input ▶︎ Enable. This will switch on the MobileUI and the corresponding Controls Menu elements to tilt and touch controls. While testing the game in Unity Editor, you can disable Mobile Input to control the airplane with the keyboard. To switch from mobile to standalone controls you only need to change Unity build target to a standalone platform.
Here is a video showing how to switch between standalone and mobile controls:
If you don’t plan on changing the provided controls, you don’t need the following information. If you want to implement a new controls scheme, here is what you need to know:
FlightKit uses Unity’s CrossPlatformInput to handle the airplane controls. If you would like to change/extend the standalone or mobile control schemes you need to feed the input to the following virtual axes (instead of the regular ‘Horizontal’ and ‘Vertical’):
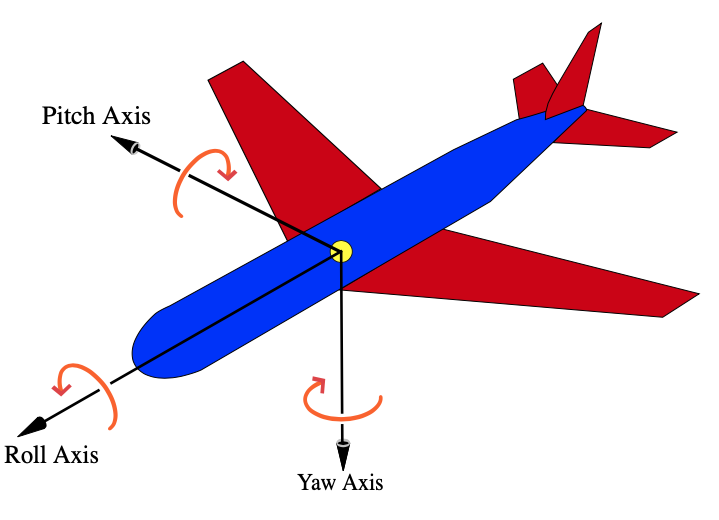
- ‘Yaw’ – rotation around the vertical axis.
- ‘Roll’ – rotation around the front-to-back axis.
- ‘Pitch’ – rotation around the side-to-side axis.
In order to use these axes, please add following entries to Unity’s input manager:
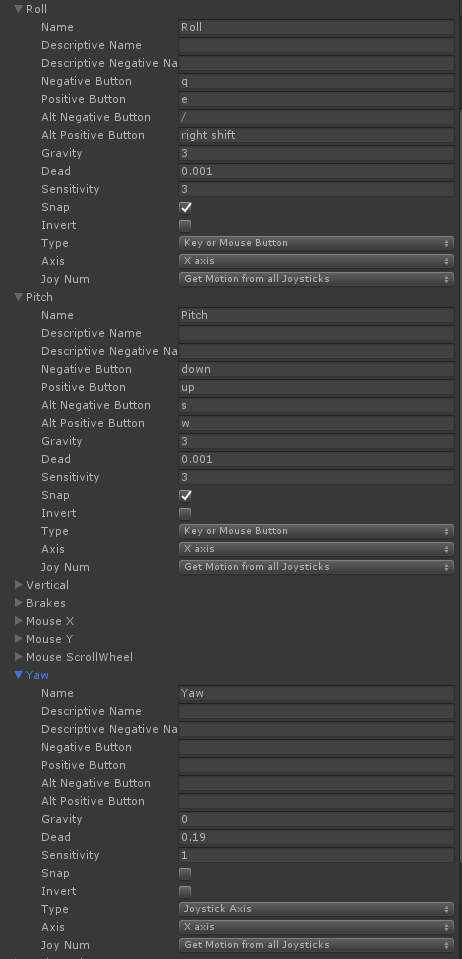
It’s easier to understand which axis does what from the illustration:
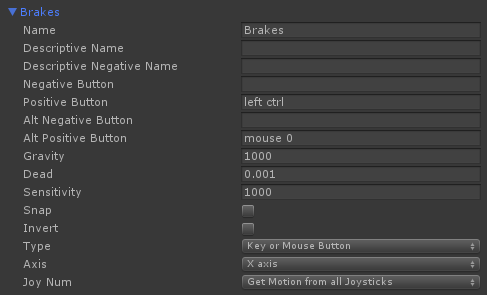
The breaks input can be set up in the following way:
The CrossPlatformInput class is designed to be called instead of Unity’s own Input class, and so mirrors certain parts of the Input API – specifically the functions relating to Axes and Buttons:
GetAxis, GetAxisRaw, GetButton, GetButtonDown, GetButtonUp
When reading input from the CrossPlatformInput class, the values returned will be taken either from Unity’s Input Manager settings, or from the mobile-specific controls set up, depending on which build target you have selected. For example, when you read CrossPlatformInput.GetAxis(“Yaw”), you will either get the “real” input value – if your build target is non-mobile, or the value from the mobile control rig – if your build target is set to a mobile platform.
Managing Ads
Ads are completely optional in Flight Kit. If you don’t need them in your project, you can simply handle RevivePermissionProvider.OnReviveRequestEvent somewhere in your code. You can do anything – charge in-game currency, show microtransaction dialog, or remove reviving completely (in this case, you would listen to FuelController.OnFuelEmptyEvent and handle it as level fail). If you would like to completely remove Ads-related functionality, you can remove the Unity Ads Provider component from the LevelScripts Game Object.
Advertisement-managing code is designed to support any ad provider, or even ad mediation services, like MoPub, Fabric, Fyber, Supersonic, etc. Only Unity Ads are integrated out-of-the-box. To enable them use the following steps:
- Familiarize yourself with Unity Ads documentation.
- Set up your game in the Unity Ads Dashboard.
- Configure Ad Units for the project. More info on this can be found in the Unity Ads documentation.
- Enable Ads in Unity Services (which can be accessed by clicking on the cloud icon in the top left of the Unity Editor).
- Uncheck Bypass Ads Provider on the Revive Permission Provider component of UICanvas > LevelScripts Game Object.
- Provide your Game ID and Ad Unit ID in the Unity Ads Provider component of UICanvas > LevelScripts Game Object.
- Add
UNITY_ADSto the Scripting Define Symbols in the Player Settings. - You should see ads when you press Revive on level fail screen.
To use an ad provider different than Unity Ads you need to create a class that extends AbstractAdsProvider. It’s really straight-forward. Take a look at the UnityAdsProvider class for an example. You can copy, rename and modify it to work with other ad providers (like AdMob). Add the new class as component to the LevelScripts GameObject and select this instance in the Ads Provider field of the Revive Permission Provider component.
COLR: Colors and Gradients
COLR, which is part of Flight Kit has its own documentation can be found here.
Note, you can use materials that don’t exploit COLR. Airplanes, for instance, use default shader.