Colr. Online Manual

Installation
In a Unity project, please, go to the Package Manager (Window - Package Manager), locate your assets, then select COLR. Press ‘Download’ and ‘Import’ after it is downloaded.
- In Built-in RP, COLR is ready to be used right after importing.
- In URP, you’ll need to unpack the URP version. Here’s how.
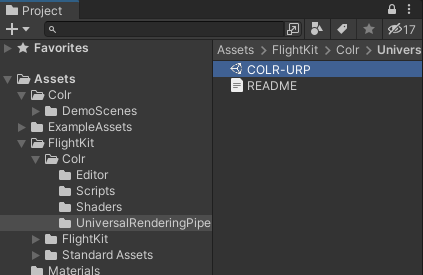
- Extract the URP files, found in the COLR/UniversalRenderingPipeline folder;
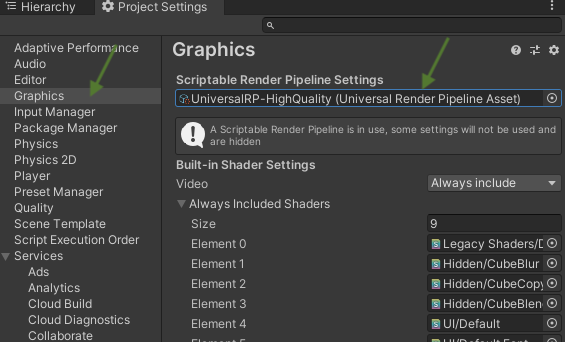
- Go to Edit - Project Settings - Graphics and set the rendering pipeline asset file there;
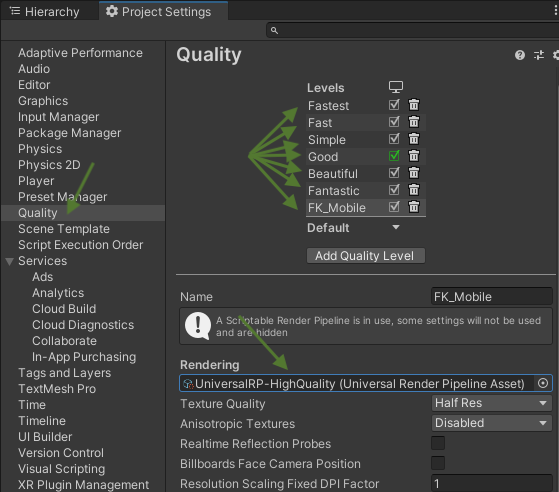
- Repeat the step above, but in Quality panel as well, for all Quality levels.
COLR. Managing Colors and Gradients
COLR is the set of shaders that helps you creatively colorize the objects in a blast. Being complex under the hood, COLR has simple yet flexible interface at your fingertips, which makes it a breeze to convert the raw sketch-looking scene into the outstanding visual experience.
COLR has two options of colorizing the objects: a) you can fill anything with a SOLID directional color. Filling with solid directional color means that you can apply a solid flat non-variable color to each of six faces of your object independently: front, back, left, right, top, bottom. b) you can apply a directional GRADIENT to any object on the scene. Directional gradient is the same as the above mentioned method but with applying the gradient instead of the solid color. This gives more flexibility and may lead to unpredictable interesting results. Top and Bottom colors can be filled with solid colors only (at the moment), since there is very little use in horizontal gradients. Gradients are supposed to work vertically, however applying the gradient sideways is possible currently via a small workaround – you can rotate the object with gradient by x or y axis. The direction of gradient changes together with the object rotation (applicable only if Master Shader Local Space is employed).
The fill type is set individually for each of the four sides (front, back, left, right), so that you can combine these methods having few sides filled with color and the rest of faces filled with gradient, in the same instance of the asset. Additionally, each of the four horizontal sides can be set to the fill mode OFF, which will interpolate the side colors between top and bottom.
How to use COLR
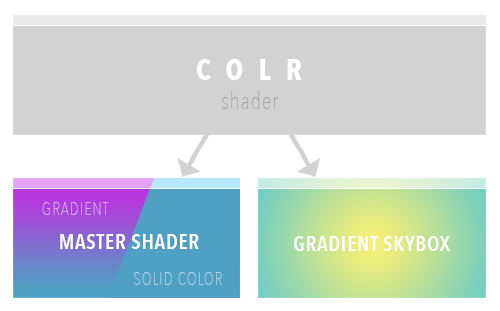
COLR shader is divided into two branches:
- Master Shader (for objects on the scene) and
- Gradient Skybox (for applying gradient to skybox)
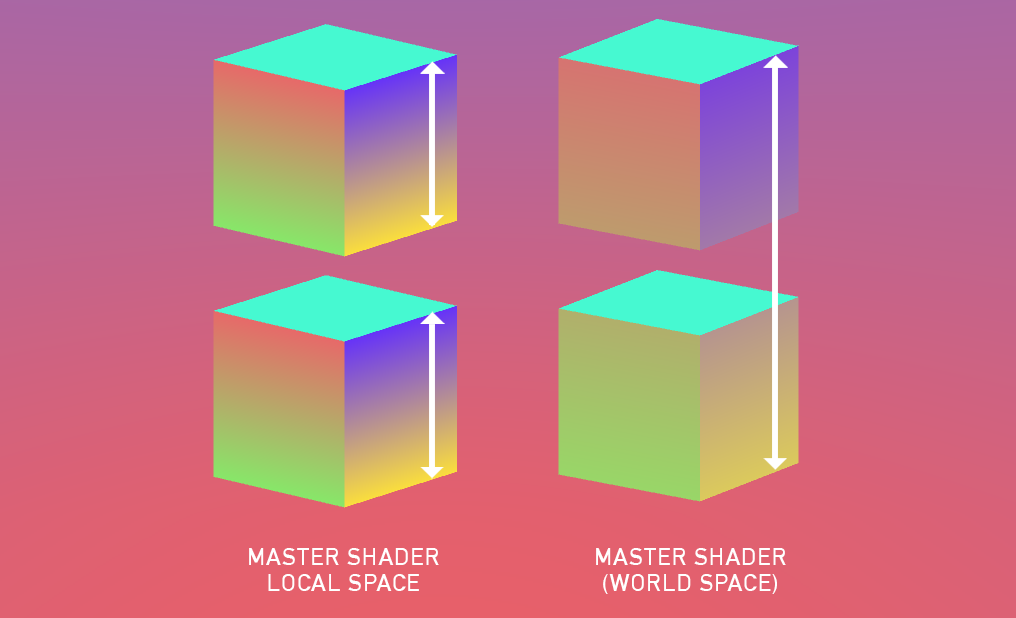
Note. Master Shader and Master Shader Local Space are mostly the same shaders but with a slight difference. Master Shader (read Master Shader World Space) fixes colors to the scene. Master Shader Local Space fixes colors to the object. Moving the object vertically and rotation have no influence on the colors of the object (see picture below). In other words, Local Space shader applies colors to relative axis, as opposing to absolute.
Important! Master Shader Local Space does not support draw call batching and combined meshes.
• For coloring the objects use Master Shader. Here’s how:
1) Сreate empty material.
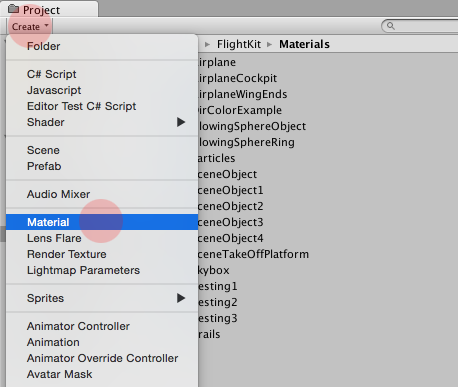
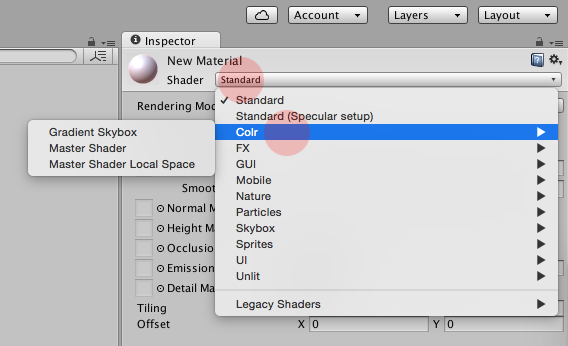
2) In Inspector panel under the name of the material you normally should see Shader menu with Standard selected. Click the drop-down menu ▶︎ navigate to Colr ▶︎ choose the Master Shader.
3) At this point you have default colors selected for Top and Bottom faces (Top Color, Bottom Color). The sides are turned off by default.
4) For each face / side click on drop-down menu where it says OFF, then choose SOLID or GRADIENT.
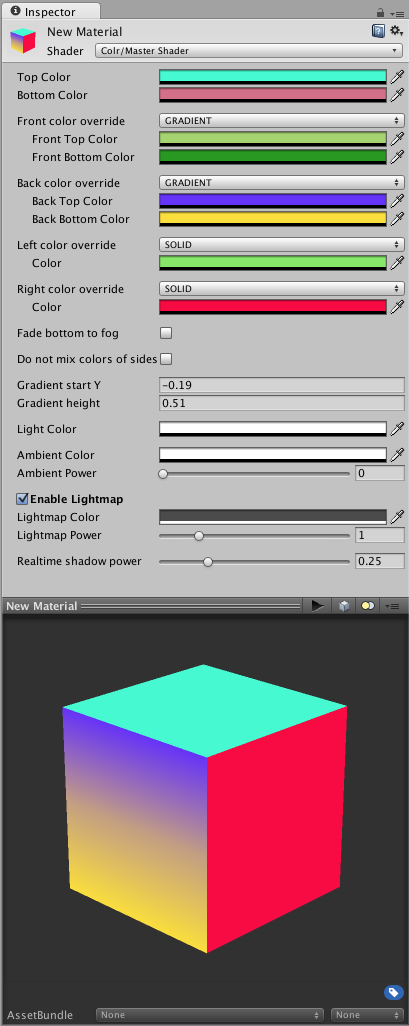
4.1) If you chose SOLID, select the color you would like the corresponding side to be filled with. 4.2) If you picked up GRADIENT, you have now the Top Color and Bottom Color for each corresponding side, e.g. Front Top Color and Front Bottom Color. 4.3) If you selected OFF, the color of the side will be a gradient between the Top Color and Bottom Color.
Other parameters of COLR Master Shader and Master Shader Local Space
Texture – diffuse texture that is multiplied with gradient, similarly as in Unity’s Standard Shader. Note that COLR does not replace the color in texture, so if you would like to use only luminance from it, you will need the texture to be grayscale.
Parameters applicable only If GRADIENT is active on any of the sides:
Gradient start Y shifts the starting point of the gradient. Basically, it moves the gradient along y-axis. It can be positive or negative value. For Master Shader this value in world coordinates, while for Master Shader Local Space it is in object coordinates.
Gradient Height shrinks or expands the boundaries of the gradient. It can be positive or negative value. If positive, the gradient looks as expected. If negative, the gradient is flipped vertically.
Gradient Angle (only in Master Shader) – by default, the gradient is horizontal, but it can be changed to any other angle with this property.
Angle Origin (only in Master Shader) – since Master Shader works in the world coordinate system, it needs to know the pivot of rotation of the previous setting. For example, if you would like the gradient to come through a particular object vertically, set this parameter to the object’s position.
Parameters common for GRADIENT and SOLID filled sides / faces:
Fade bottom to fog makes a smooth visual transition for the lower part of a scene into the color picked in Fog parameter. If enabled, the below-standing parameter – Do not mix colors – is automatically enabled.
Do not mix colors If enabled, preserves the colors of the faces / sides invariable during the object rotation until their rotation angle overcomes certain threshold. By default the parameter is disabled, thus when the faces of objects are not strictly perpendicular to their corresponding axis, their colors are blended with the colors of axis they lean towards. To be more clear, see picture below.

Light Color applies the light tint on the object. It is the similar effect to the photo filter.
Ambient Color applies the ambience color tint with the strength adjusted with Ambient Power. It works similarly to the exposure.
Enable Lightmap allows the material to diffuse shadows with a baked lightmap.
Lightmap Color applies the tint of the shadow diffused. The strength of the lightmap can be adjusted with Lightmap Power.
Important! COLR is material-dependent, which means if you apply one material for numerous objects on the scene, changing the parameters of this material affects all objects it is applied to.
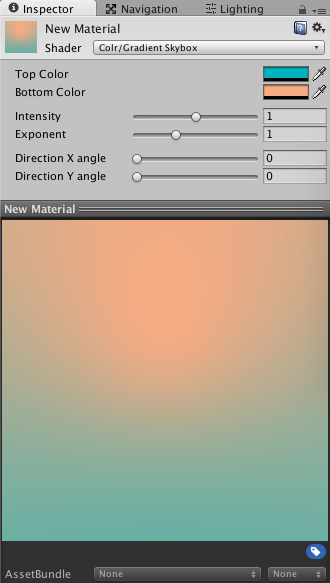
• For the skybox, COLR offers you the option to make a gradient skybox.
1) create empty material, name it Skybox.
2) In Inspector panel under the name of the material you normally should see Shader menu with Standard selected. Click the drop-down menu ▶︎ navigate to Colr ▶︎ choose Gradient Skybox.
3) Choose Top Color and Bottom Color of your skybox either with color pop up menu (click on the color rectangle) or with a color picker (click the “eyedropper” icon and click on any place of the scene where you see a desired color).
4) To apply the skybox to the scene, go to Hierarchy tab ▶︎ Starting Components ▶︎ select MultipurposeCameraRig. Go to Lighting tab ▶︎ click Scene button. There is a Skybox pick up menu under Environment Lighting part of the window. Click the “aim” icon and choose you Skybox material.
Other parameters of COLR Skybox Gradient
Intensity is the strength of light emitted by skybox.
Exponent adjusts the dominancy of top color or bottom color.
Direction X angle and Direction Y angle are self-explanatory. These parameters determine the direction of the gradient.
Changing colors from code
If you need to change colors of an object (Master Shader or Master Shader Local Space), then you need to set one or more of the color properties:
- “_TopColor”,
- “_BottomColor”,
- “_FrontTopColor”,
- “_FrontBottomColor”,
- “_BackTopColor”,
- “_BackBottomColor”,
- “_RightTopColor”,
- “_RightBottomColor”,
- “_LeftTopColor”,
- “_LeftBottomColor”.
An example code is:
GetComponent().material.SetColor("_FrontTopColor", Color.green);
If you would like to do this with the GradientSkybox material, then the color variables are “_Color1” (bottom) and “_Color2” (top). The approximate code is:
RenderSettings.skybox.SetColor("_Color2", Color.green);
Have fun!